# Content & Marketing Standards
A compelling product page is crucial for conversion. Every element must be crafted to build trust and communicate value clearly.
# Product Name Guidelines
# 🚨 Naming Requirements
Your product name is the first impression merchants have:
Structure Formula: [Primary Function]: [Brief Explanation]
👍 DO
- ✅ "Advanced SEO: Meta Tags & Rich Snippets Manager"
- ✅ "One-Page Checkout: Express Purchase Process"
- ✅ "Inventory Sync: Multi-Channel Stock Management"
👎 DON’T
- ❌ "PrestaShop" (redundant on the marketplace)
- ❌ "Module" or "Theme" (obvious from context)
- ❌ Version numbers ("v2.1", "2024 Edition")
- ❌ External brand names without permission
- ❌ Superlatives without proof ("Best", "Ultimate", "#1")
# Length Limits:
- Maximum: 70 characters
- Optimal: 45-60 characters
- Must be unique across the marketplace
⚠️ Please note that the product name you will choose will be used to generate your addons module’s link. Each time you’ll make a change in your product name it will create a new link and an automated redirection that might affect Google’s understanding and hence your SEO. We strongly recommend to avoid changing your product name.
# Description and Benefits
# 🚨 Short Description (250 characters max)
This appears on category pages and homepage features:
👍 DO
- ✅ "Boost your SEO ranking with automated meta tags, structured data, and XML sitemaps. Generate rich snippets for products and increase click-through rates by up to 40%."
👎 DON’T
- ❌ "This module helps with SEO optimization for your store." (too generic)
- ❌ "Implements schema.org (opens new window) microdata with JSON-LD structured data output compatible with Google's Rich Results specifications." (too technical)
# 🚨 Merchant Benefits (Required for modules)
Focus on business value, not features:
👍 DO
- ✅ "Reduce cart abandonment by 25% with streamlined checkout"
- ✅ "Save 10 hours/week on inventory management automation"
- ✅ "Increase average order value by 15% with smart cross-selling"
👎 DON’T
- ❌ "Uses AJAX for dynamic content loading" (technical feature, not benefit)
# Customer Benefits
Explain the end-customer experience:
👍 DO
- ✅ "Customers enjoy faster page loading and mobile-optimised experience"
- ✅ "One-click reordering for returning customers increases satisfaction"
- ✅ "Real-time shipping costs prevent checkout surprises"
# Feature Documentation
# 🚨 Minimum 3 Distinct Features
Each feature must be specific and measurable:
👍 DO
- ✅ “Advanced filtering: 15+ filter types including price ranges, attributes, and custom fields”
- ✅ “Smart search: Autocomplete with typo tolerance and synonym recognition”
- ✅ “Export capabilities: CSV/XML export with 20+ customisable data fields”
👎 DON’T
- ❌ "Easy to use interface"
- ❌ "Powerful functionality"
- ❌ "Advanced options"
# Product Icon Requirements
# 🚨 Format specifications
- Size: Exactly 256x256 pixels
- Format: JPG, or PNG
- Background: Can be transparent or solid colour
- Content: Must visually represent the module's primary function
# ❌ Forbidden Elements:
- PrestaShop logo or branding
- External brand logos (Facebook, Google, etc.) without permission
- Generic "module" or "puzzle piece" icons
- Identical icons across multiple products
# ⚠️ Strongly suggested
- Professional appearance - No amateur graphics, clipart (no blurring or pixelation)
- Clear symbolism - Icon should be understandable without text
- Brand consistency - Align with your company's visual identity
- Scalability - Must remain clear when displayed at smaller sizes
# Screenshots and images
# 🚨 Minimum Requirements:
- Quantity: At least 3 screenshots per supported language
- Resolution: 1000x1000 pixels minimum
- Quality: High resolution, no blurring or pixelation
- Content: Mix of back-office and front-office views
# Image Recommendation Guidelines:
👍 DO
- ✅ Use realistic, high-quality product images
- ✅ Show the module in action with realistic data
- ✅ Demonstrate clear before/after improvements
- ✅ Include mobile responsiveness when relevant
- ✅ Highlight unique selling points visually
👎 DON’T
- ❌ Screenshots containing contact information
- ❌ Watermarks or promotional overlays
- ❌ Test data that looks unprofessional
# Comprehensive User Guide
# 🚨 Documentation Requirements:
- Format: PDF only
- Language: English mandatory, and each version per language defined in the product sheet
- Naming conventions: readme_[isocode].pdf (for example for english it must be readme_en.pdf)
- Content:
- PrestaShop version compatibility
- PHP requirements
- Step-by-step installation process
- License activation (if applicable)
# ⚠️ Essential Documentation Sections:
- Installation Guide
- PrestaShop version compatibility
- PHP requirements
- Step-by-step installation process
- License activation (if applicable)
- Configuration Manual
- Initial setup walkthrough
- All configuration options explained
- Feature Documentation
- Detailed feature explanations
- Screenshot-heavy instructions
- Advanced configuration options
- Troubleshooting common issues
- FAQ Section
- Address most common questions
- Compatibility concerns
- Support contact information
# ✅ Other recommendations
- Concise and clear - Avoid unnecessary technical jargon
- Step-by-step approach - Break complex processes into simple steps
- Visual aids - Include screenshots for every major step
- Helpful tone - Assume merchants are busy and need efficiency
- Scannable format - Use headers, bullets, and white space effectively
# ⚠️ Demo Guidelines
Having a Demo is Highly Recommended (Soon Mandatory)
Products with demos convert 2x better than those without
# ✅ Video Demo recommendations
- Duration: 2-5 minutes maximum
- Focus: Step-by-step installation and key features
- Style: Professional, not overly commercial
- Hosting: YouTube, Vimeo, or Dailymotion via HTTPS
- Quality: HD resolution with clear audio
# Live Demo Implementation
# ⚠️ Back-Office Demo Requirements:
- Access credentials: Username:
[email protected], Password:demodemo - Content: Show realistic configuration and usage scenarios
- Functionality: All major features should be demonstrable
- Performance: Fast loading times and responsive interface
- Security: No contact information or external links visible
# ⚠️ Front-Office Demo Requirements:
- Customer experience focus - Show how features benefit end customers
- Theme compatibility - Demonstrate with popular themes (Classic, Hummingbird)
- Responsive design - Works flawlessly on mobile devices
- Real-world scenarios - Use realistic product catalogues and customer journeys
# Technical Implementation:
// Demo-specific configuration
if (Tools::getValue('demo_mode') === 'true') {
    Configuration::updateValue('MYMODULE_API_KEY', 'demo_api_key');
    Configuration::updateValue('MYMODULE_DEMO_DATA', true);
}
# Tip: How to create a demo shop for your module
When you submit your product sheet, you can offer a demo shop for your module, so that merchants can test your module.
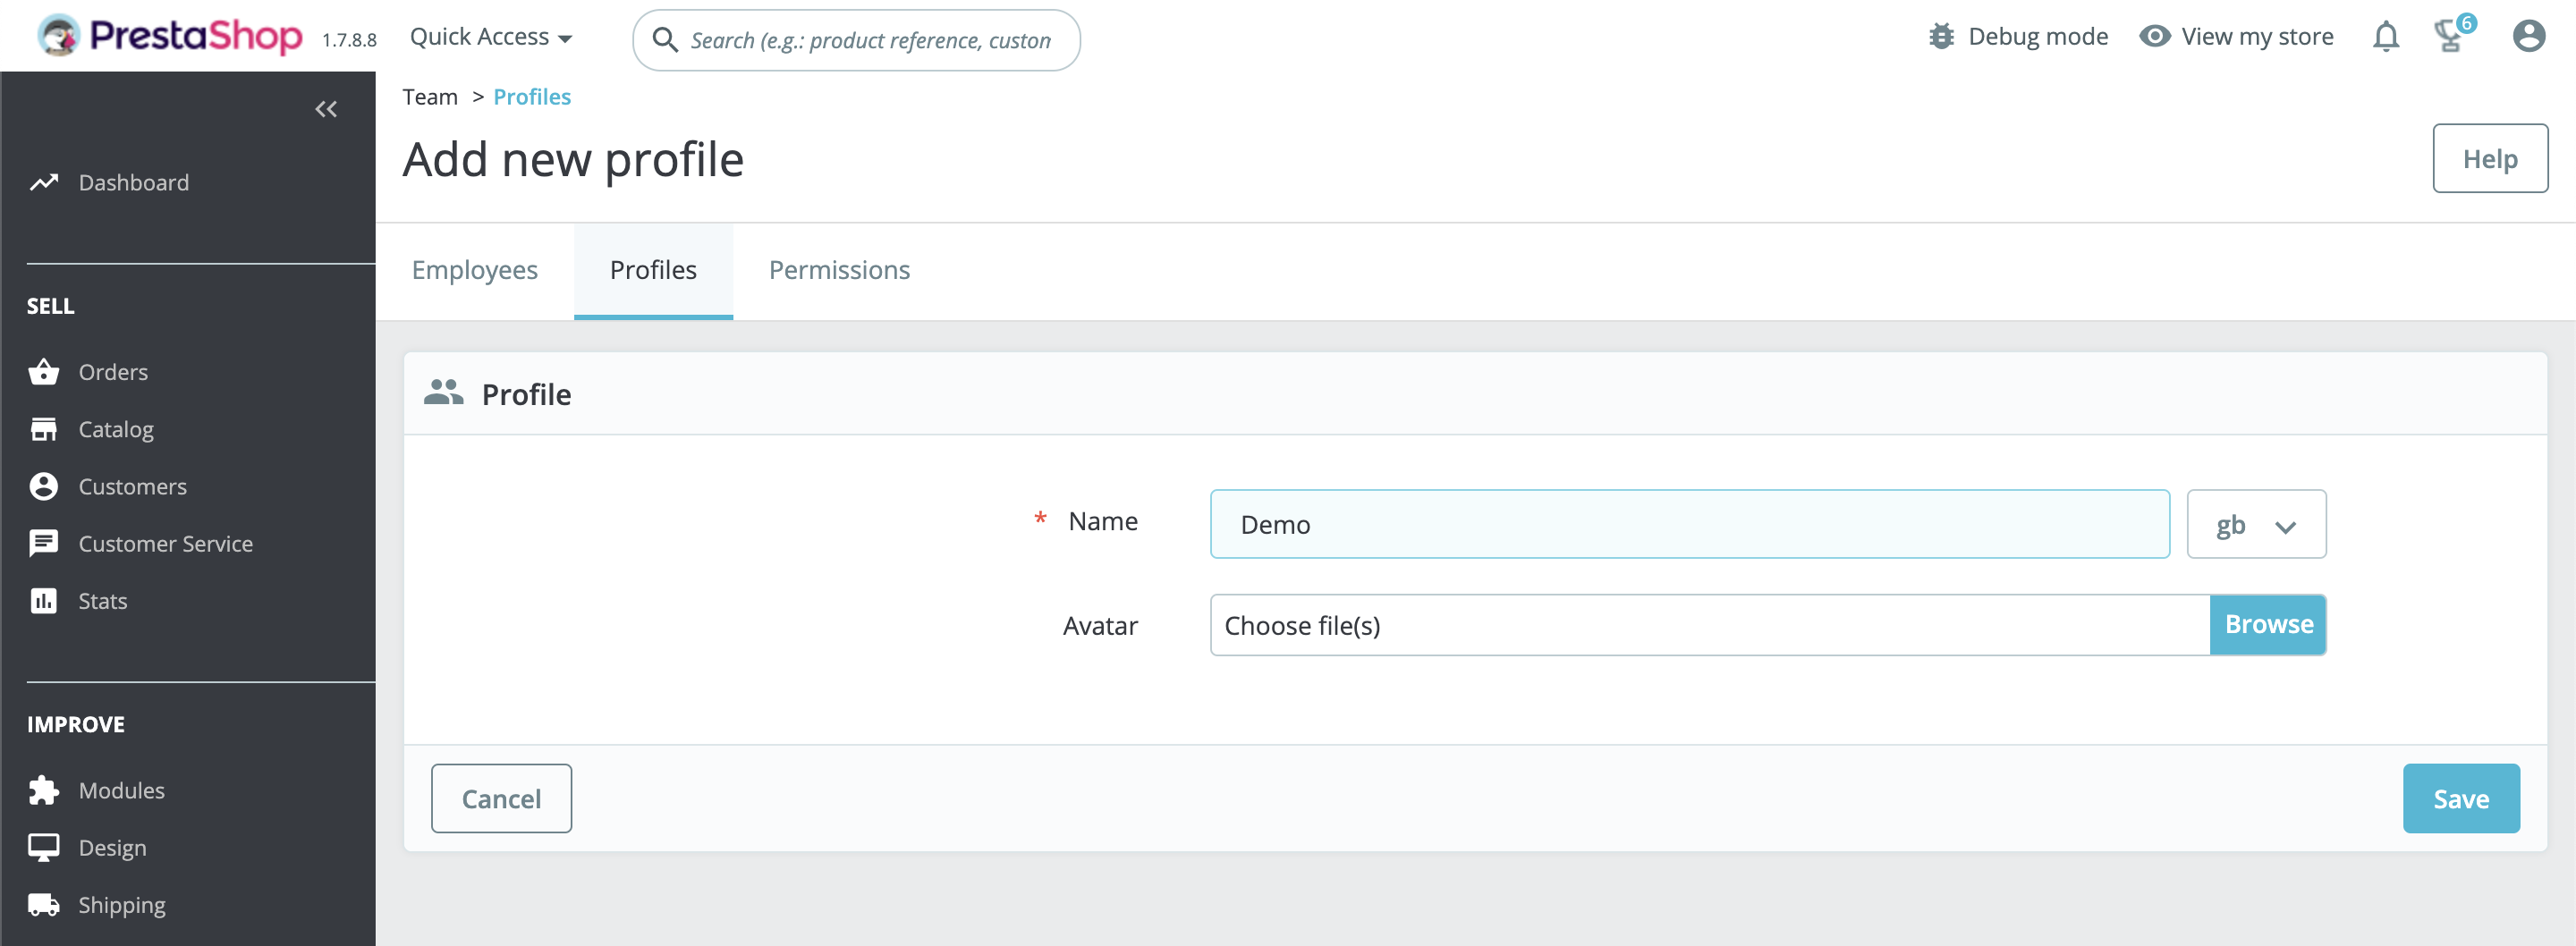
# 1. Add a new profile
To restrict use of the back office to configuring your module, you need to create a profile with limited rights.
In your back office, go to the Advanced Parameters, Team section, then to the Profiles tab:
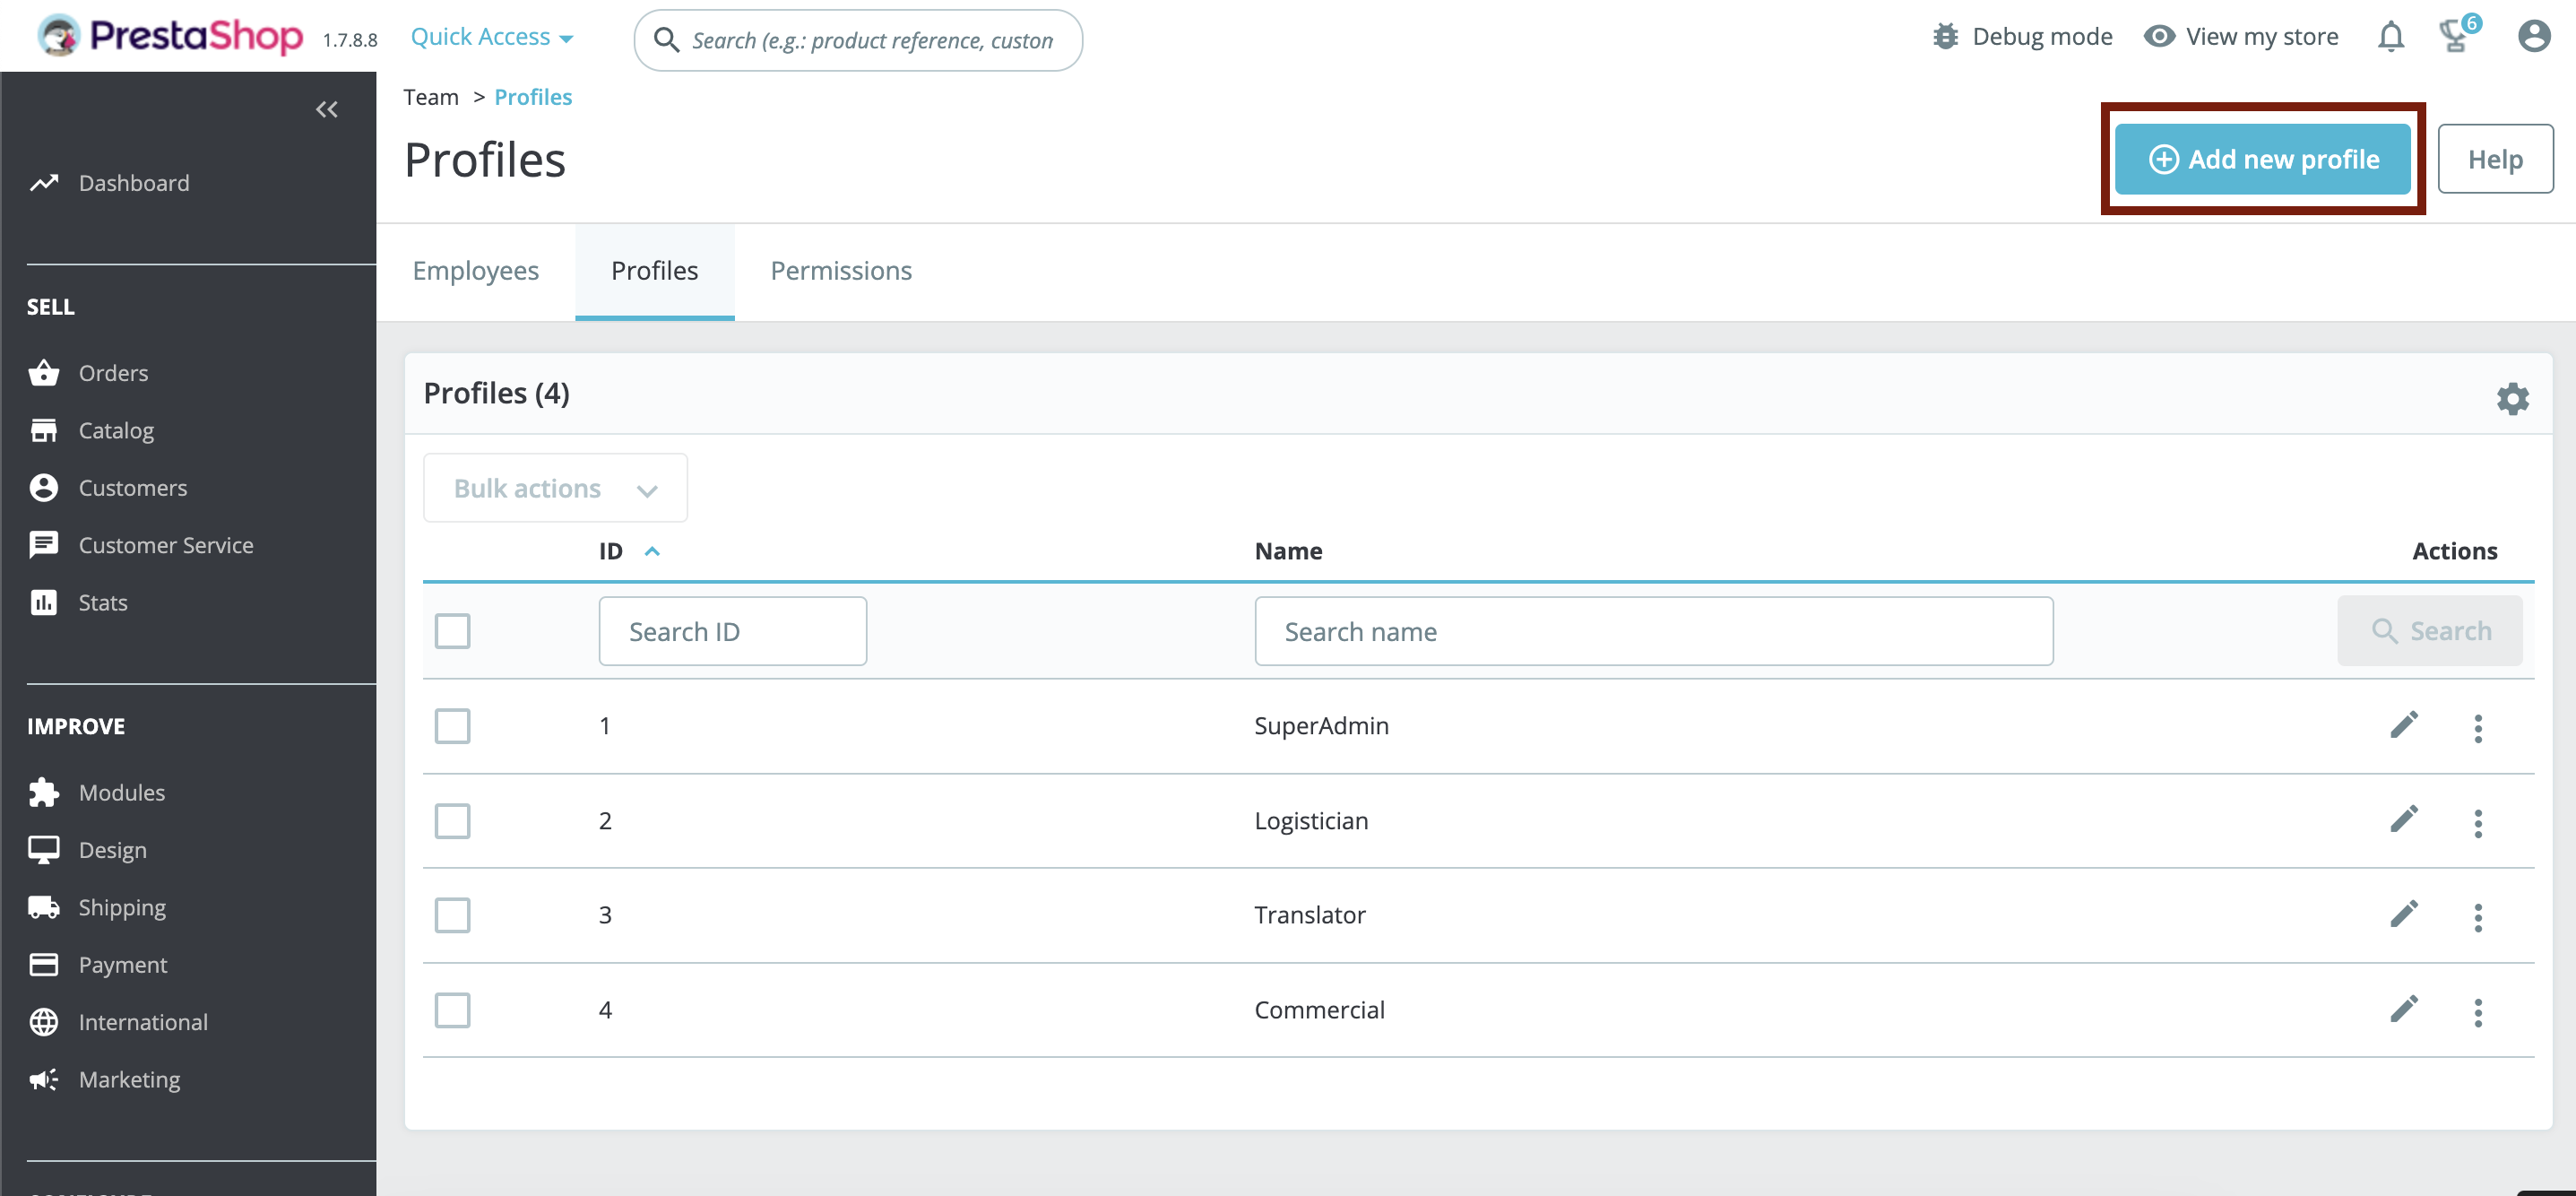
Add a new profile:
# 2. Configure profile’s permissions
In the Permissions tab, select the profile you have just created and grant it the rights below. In the right-hand column, choose your module, which has already been installed in your shop.

WARNING
Please note that the module configuration will only work with the default form (submitTechnicalName). If your module contains several configuration forms, this will not work.
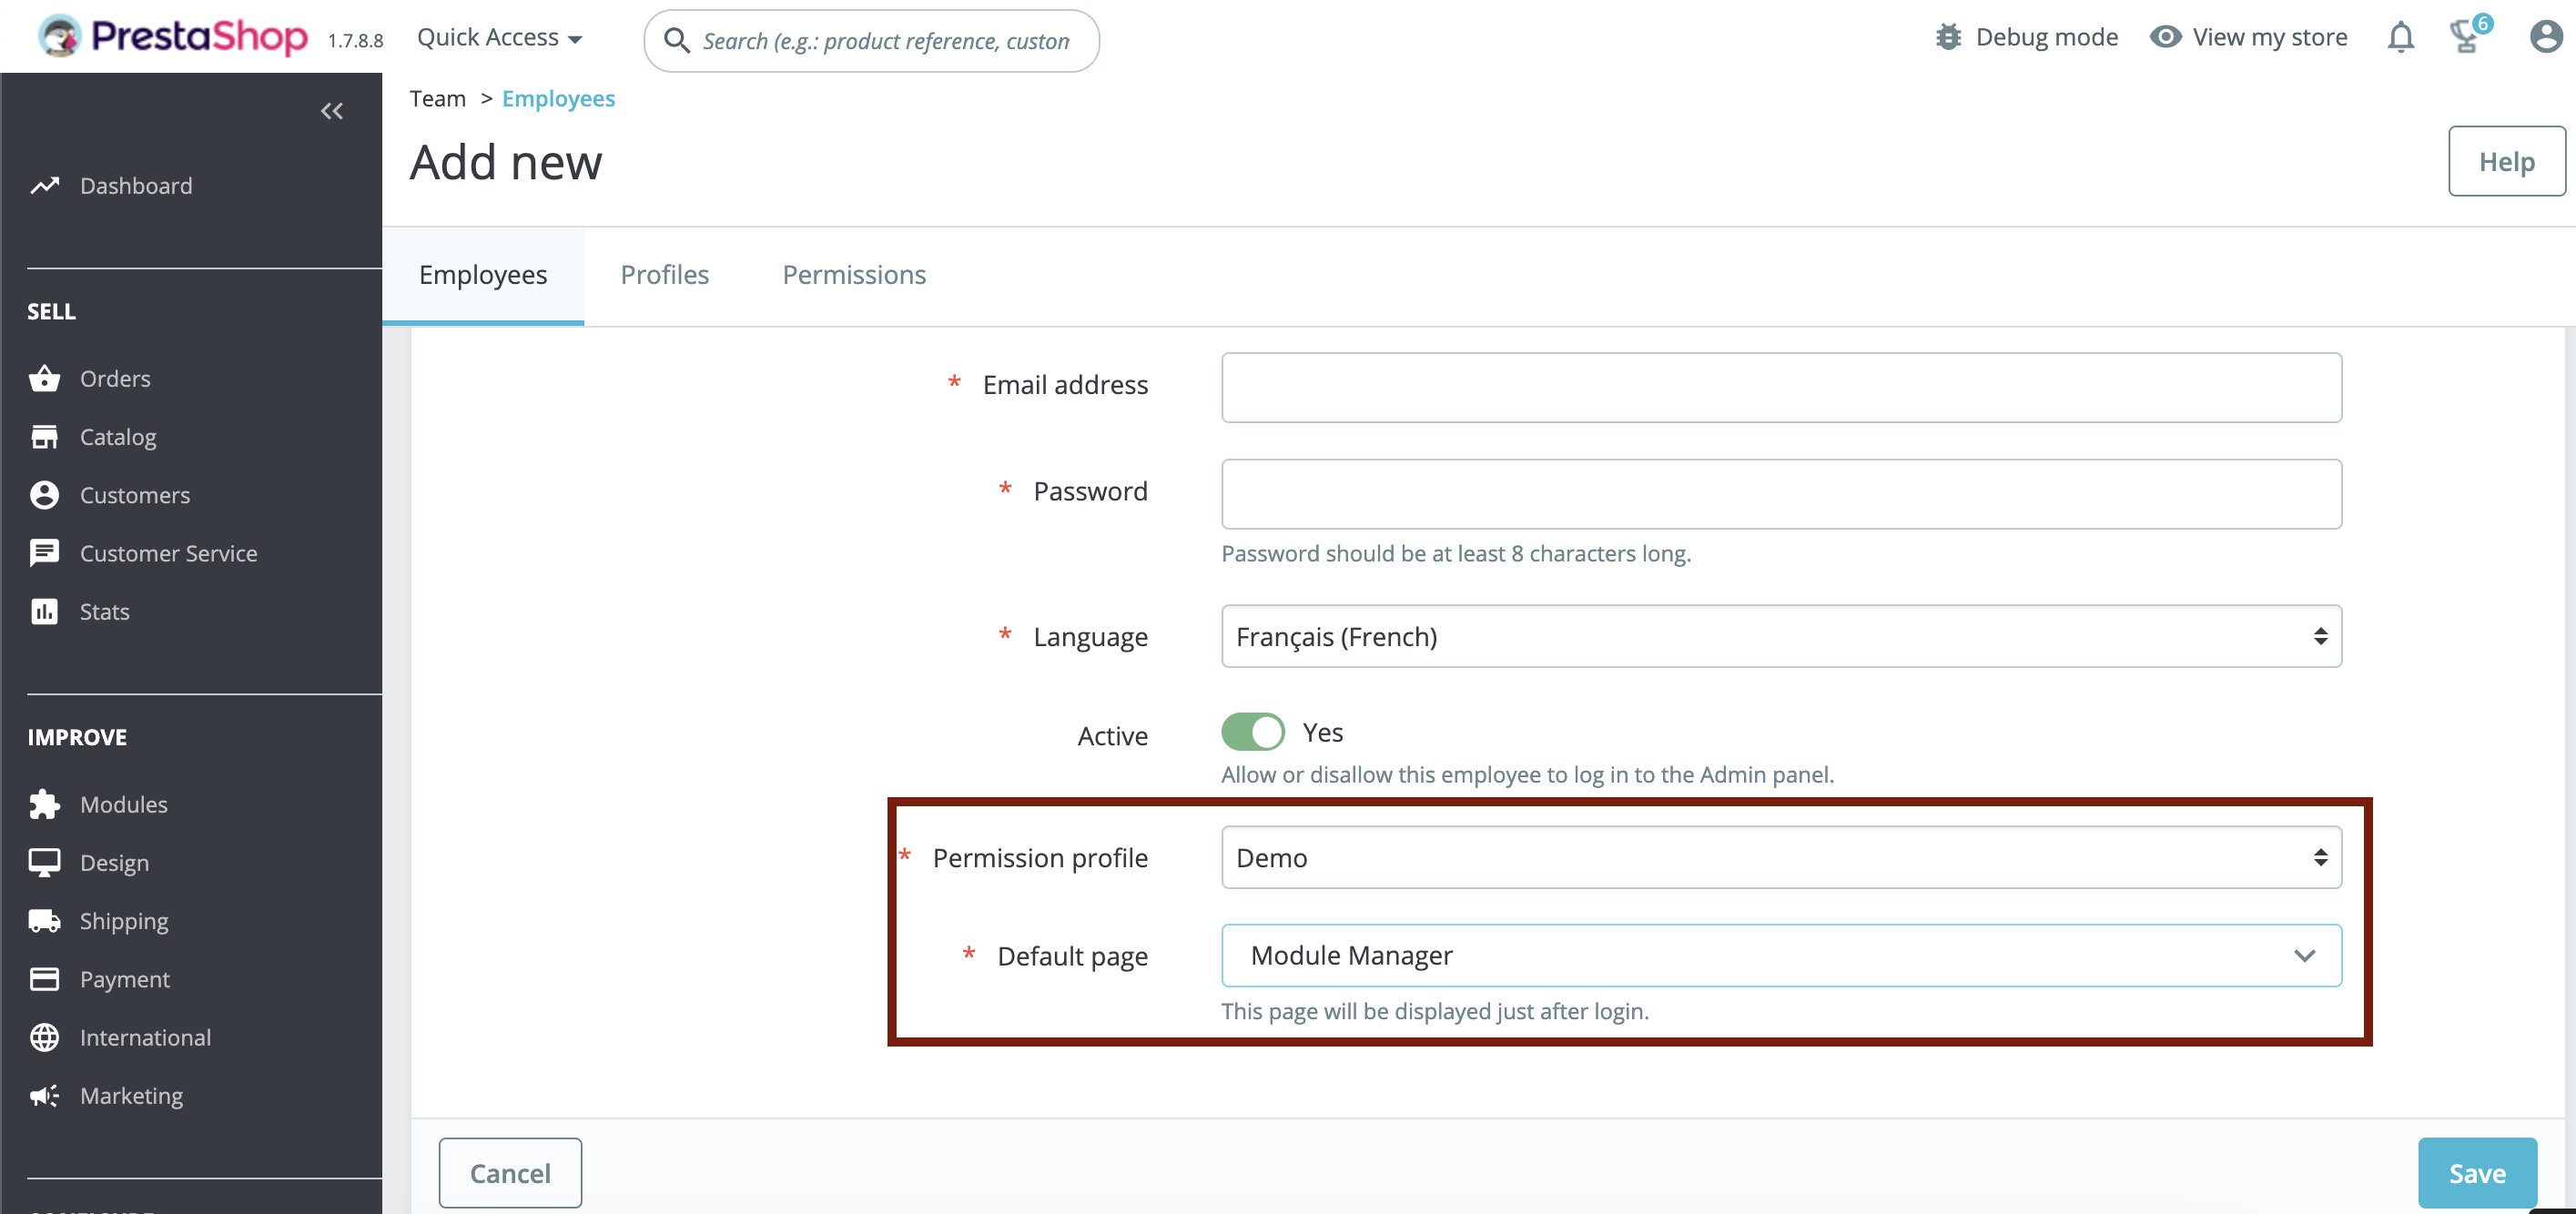
# 3. Create a back office account
You can now create an account to access the back office with the permissions you created earlier.
In general, the email to use is [email protected] and the password demodemo.

You need to set the default page to "Module Manager", the only one available with demo profile permissions.
# For PrestaShop 8.x
From PrestaShop 8, this password will be considered too simple, so you need to change the password policy in the security settings.

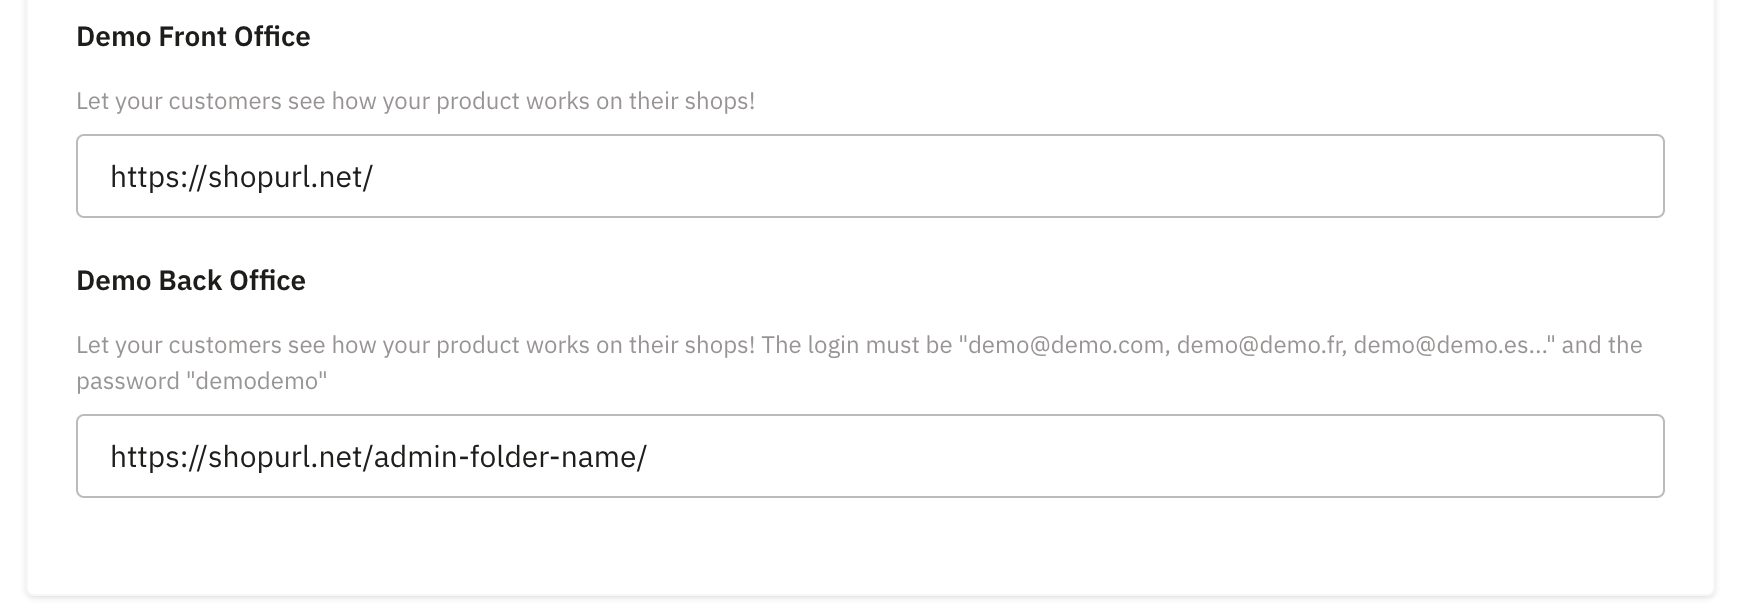
# 4. Add the demo shop url to your product sheet
When you submit your product sheet, you can enter the information for your demo.
# 5. Other information about demo shops
# Regular reset of demonstration instances
Even with restricted rights in the back office, visitors of the demo will be able to modify the module's configuration.
To ensure a consistent experience over time, we recommend that you reset the shop regularly (every night, for example) so that you return to a shop with the module's default settings. Or to just “reset” the module configuration itself.
# Cookie management for display in the Addons iframe
The Addons marketplace displays demo shops via an iframe. The shop's cookie management must therefore be modified to allow this.
You need to change this setting to allow users to log in to the back office, in the Administration section.
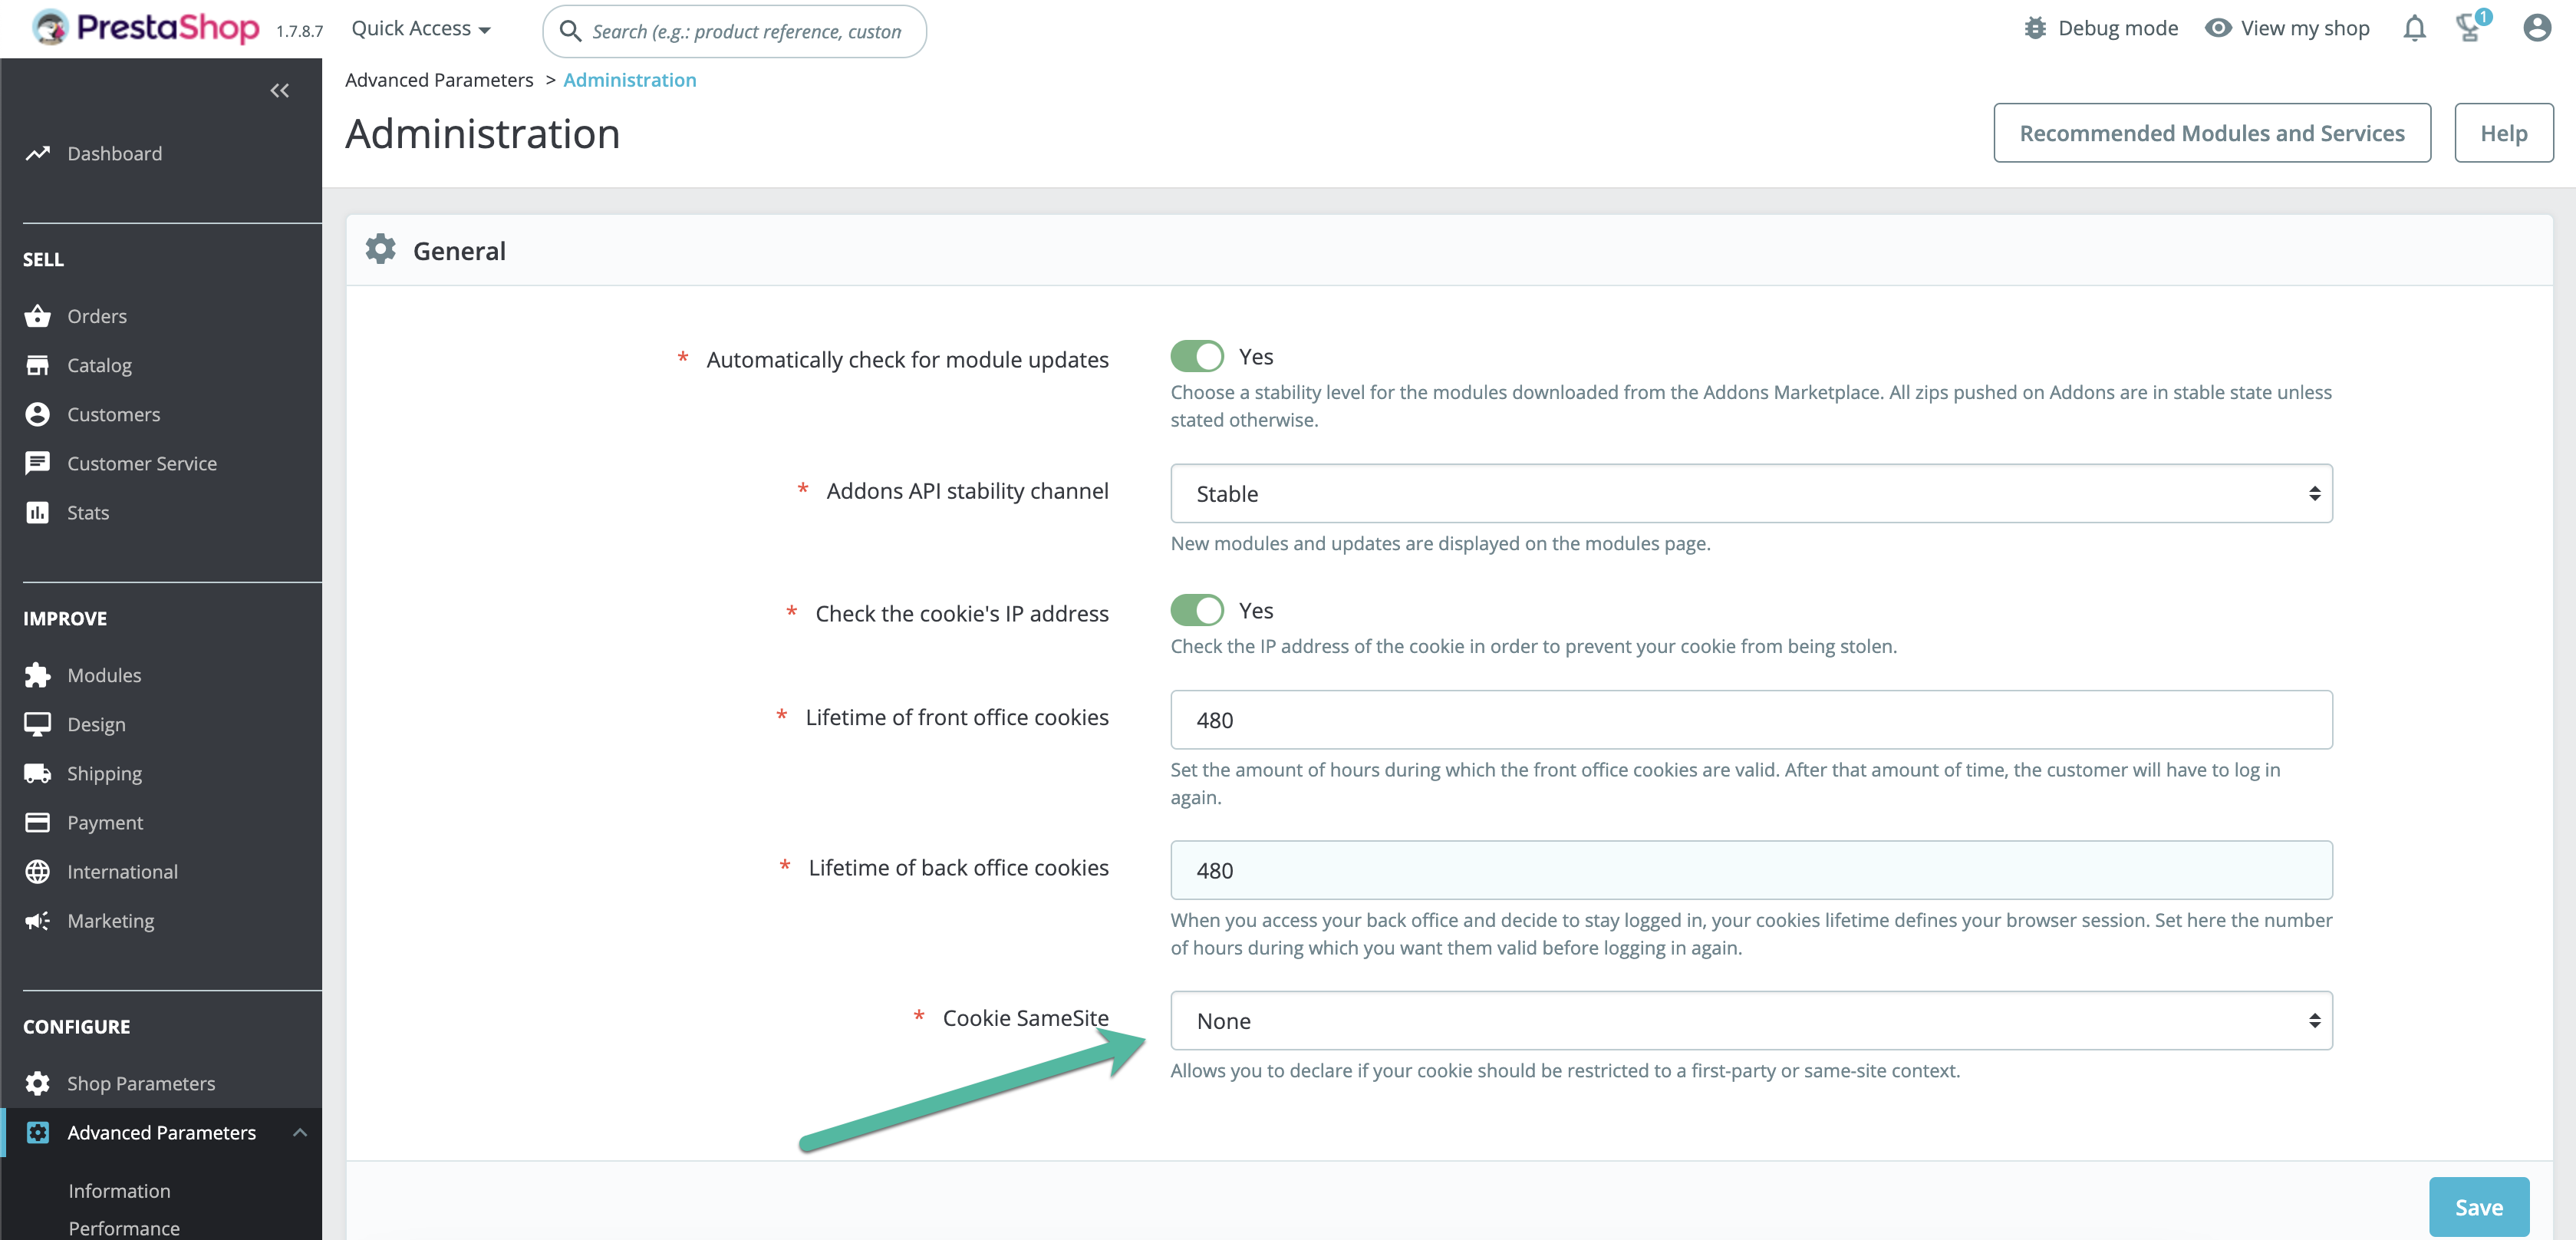
This allows cookies from a domain name other than that of the shop to be authorised. To be used for demonstration purposes only.
You can also modify the .htaccess at the root of your shop to apply this rule to all cookies.
<ifmodule mod_headers.c>
Header always edit Set-Cookie ^(.*)$ $1;SameSite=None;Secure
</ifmodule>