# 🛂 Integrating a Module with PrestaShop Account
# Prerequisites
To complete this procedure, you need to have at your disposal a running PrestaShop store (see Preparing your environment) and a module that you can either create yourself (opens new window) or generate (opens new window).
Warning
Integrating your module will require using PHP (opens new window) for the backend. In the following procedure, we used JavaScript (opens new window) for the frontend, but you can also choose to use Vue.js 3 (opens new window) or React (opens new window), according to your preference.
Example module
An example module already integrating the components of the PrestaShop Integration Framework is available on Github (opens new window) to help you with development.
# Install PrestaShop Account
To register your module and PrestaShop Account as services, create a
config\admin\services.ymlfile with the following contents at the root of the module folder:services: _defaults: public: true ############## # Your Module <module_name>.module: class: <module_name> factory: ['Module', 'getInstanceByName'] arguments: - '<module_name>' <module_name>.context: class: Context factory: ['Context', 'getContext'] ##################### # PrestaShop Account <module_name>.ps_accounts_installer: class: 'PrestaShop\PsAccountsInstaller\Installer\Installer' arguments: - '5.0' <module_name>.ps_accounts_facade: class: 'PrestaShop\PsAccountsInstaller\Installer\Facade\PsAccounts' arguments: - '@<module_name>.ps_accounts_installer'1
2
3
4
5
6
7
8
9
10
11
12
13
14
15
16
17
18
19
20
21
22
23
24
25
26
27
28Note
For more information about services, see the related documentation (opens new window).
Make sure you replace every occurrence of
<module_name>with the actual name of your module.At the root of your module folder, create a file named
composer.jsonwith the following contents:{ "name": "prestashop/<module_name>", "description": "", "config": { "preferred-install": "dist", "optimize-autoloader": true, "prepend-autoloader": false, "platform": { "php": "7.1" } }, "require-dev": { "prestashop/php-dev-tools": "^4.2.1" }, "require": { "php": ">=5.6", "prestashop/prestashop-accounts-installer": "^1.0", "prestashop/module-lib-service-container": "^1.4" }, "autoload": { "classmap": [ "<module_name>.php" ] }, "author": "PrestaShop", "license": "MIT" }1
2
3
4
5
6
7
8
9
10
11
12
13
14
15
16
17
18
19
20
21
22
23
24
25
26
27
28Make sure you replace every occurrence of
<module_name>with the actual name of your module.Run the
composer install --no-dev -ocommand to implement the new dependencies.
Warning
To reduce the final size of your module, we recommend using the composer install --no-dev -o command, to exclude development dependencies from the vendor folder.
# Edit the <module_name>.php File
Note
For simplification, all PHP methods listed below are created in the <module_name>.php file.
Feel free to reorganize the code structure in a different way to match your module evolution.
# Set Up the Automatic Installation
Add the following highlighted contents to the <module_name>.php file.
This will allow your module to automatically install PrestaShop Account when necessary, and allow you to use the PrestaShop Account service.
if (!defined('_PS_VERSION_')) {
    exit;
}

$autoloadPath = __DIR__ . '/vendor/autoload.php';
if (file_exists($autoloadPath)) {
    require_once $autoloadPath;
}

class <module_name> extends Module {
    /**
     * @var ServiceContainer
     */
    private $container;

    public function __construct()
    {
        // ...

        if ($this->container === null) {
            $this->container = new \PrestaShop\ModuleLibServiceContainer\DependencyInjection\ServiceContainer(
                $this->name,
                $this->getLocalPath()
            );
        }
    }

    // ...
    public function install()
    {
        // Load the PrestaShop Account utility
        return parent::install() &&
            $this->getService('<module_name>.ps_accounts_installer')->install();
    }

    // ...

    /**
     * Retrieve the service
     *
     * @param string $serviceName
     *
     * @return mixed
     */
    public function getService($serviceName)
    {
        return $this->container->getService($serviceName);
    }
}
2
3
4
5
6
7
8
9
10
11
12
13
14
15
16
17
18
19
20
21
22
23
24
25
26
27
28
29
30
31
32
33
34
35
36
37
38
39
40
41
42
43
44
45
46
47
48
49
Warning
It is important to load autoload.php manually, for open-source versions of PrestaShop that do not already have the libraries present in composer.json.
# Inject the Library and Context
To work properly, PrestaShop Account requires some information which is provided by injecting a context. To do so, you need to update the getContent function. This will inject contextPsAccounts into the browser window object (window.contextPsAccounts).
The PrestaShop Account service is also responsible for returning the proper URL for the frontend component.
Add the following highlighted contents to the <module_name>.php file:
public function getContent()
{
    /**
     * If values have been submitted in the form, process.
     */
    if (((bool)Tools::isSubmit('submit<module_name>Module')) == true) {
        $this->postProcess();
    }

    $this->context->smarty->assign('module_dir', $this->_path);

    /*********************
    * PrestaShop Account *
    * *******************/

    $accountsService = null;

    try {
        $accountsFacade = $this->getService('<module_name>.ps_accounts_facade');
        $accountsService = $accountsFacade->getPsAccountsService();
    } catch (\PrestaShop\PsAccountsInstaller\Installer\Exception\InstallerException $e) {
        $accountsInstaller = $this->getService('<module_name>.ps_accounts_installer');
        $accountsInstaller->install();
        $accountsFacade = $this->getService('<module_name>.ps_accounts_facade');
        $accountsService = $accountsFacade->getPsAccountsService();
    }

    try {
        Media::addJsDef([
            'contextPsAccounts' => $accountsFacade->getPsAccountsPresenter()
                ->present($this->name),
        ]);

        // Retrieve the PrestaShop Account CDN
        $this->context->smarty->assign('urlAccountsCdn', $accountsService->getAccountsCdn());

    } catch (Exception $e) {
        $this->context->controller->errors[] = $e->getMessage();
        return '';
    }

    $output = $this->context->smarty->fetch($this->local_path.'views/templates/admin/configure.tpl');
    return $output;
}
2
3
4
5
6
7
8
9
10
11
12
13
14
15
16
17
18
19
20
21
22
23
24
25
26
27
28
29
30
31
32
33
34
35
36
37
38
39
40
41
42
43
44
# Edit the Template File
Access the template file allowing you to render the configuration page for your module in the back office. If your module was created through the generator (opens new window), it has the following path:
views/templates/admin/configure.tpl. Create it if necessary.In the
<module_name>.phpfile, make sure your template file's path matches the one defined in this line:$output = $this->context->smarty->fetch($this->local_path.'views/templates/admin/configure.tpl');1In the template file, add the following tag at the beginning:
<prestashop-accounts></prestashop-accounts>1In the template file, add the following script lines at the end:
<script src="{$urlAccountsCdn|escape:'htmlall':'UTF-8'}" rel=preload></script>

<script>
    /*********************
    * PrestaShop Account *
    * *******************/
    window?.psaccountsVue?.init();
</script>
1
2
3
4
5
6
7
8
# Restrict the Configuration Until PrestaShop Account Is Associated
For merchants to configure the module, PrestaShop Account needs to be associated.
Two functions allow you to check if PrestaShop Account has been associated:
- The
$accountsService->isAccountLinked();PHP function - The
window.psaccountsVue.isOnboardingCompleted()JavaScript function
They will return true if the association has been performed, and false if not.
You can use either of these functions to prevent the merchant from proceeding with the module configuration until they have done the association. While the PHP function provides stricter security, the JavaScript one allows you to customize the display.
# 💡 Example
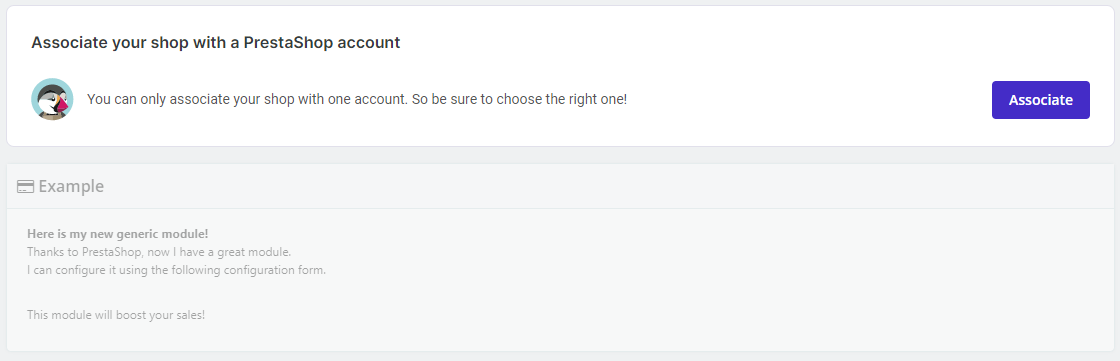
For example, you can use the following code in the template file to gray out the configuration pane until the association is done:
<script>
    /*********************
    * PrestaShop Account *
    * *******************/
    window?.psaccountsVue?.init();

    if(window.psaccountsVue.isOnboardingCompleted() != true)
    {
    	document.getElementById("module-config").style.opacity = "0.5";
    }
</script>
2
3
4
5
6
7
8
9
10
11
This code will create the following output:
# Test Your Module
To test if PrestaShop Account is loading successfully into your module:
Zip your module folder.
In the back office of your PrestaShop store, go to Modules > Module Catalog.
Click the Upload a module button and select your archive.
Click Configure in the pop-up window that displays.
➡️ Your module configuration page should contain the PrestaShop Account association panel:
