# 🏹 Submitting Your Module
Once the development of your module is done, it needs to be submitted for technical and marketing validation before it can be added to the PrestaShop Marketplace (opens new window). Follow the procedure below to get your module validated.
# Create a Product Page
Log in to your PrestaShop Marketplace account (opens new window). Either you, your developer or your agency should have the credentials.
Access your seller account:

In the Products section, select New > Add a Module.
➡️ A new product sheet displays.
Provide as much information as possible. The following is mandatory :
- Icon (JPEG, PNG or GIF, with a size of 57x57px)
- Available countries
- Marketing content
- Short description
- Benefits for merchants (at least one)
- Features
- Benefits for customers (at least one)
- At least 5 keywords (remember to add keywords in every language you support)
- At least 3 screenshots/images (the square format is more readable)
Note
You are not allowed to give your e-mail address and website URL neither in your PrestaShop Marketplace page nor in your documentation.
See the contributor guide (opens new window) for more details.
Read some SEO tips (opens new window) to optimize your product page and learn how to improve your ranking (opens new window) on PrestaShop Marketplace.
Click on Submit Your Product.
➡️ You can now proceed to the next step: submitting your zipped module.
# Submit Your Zipped Module
# Use the Validator
Before submitting your module for technical validation, make sure you have used the Validator (opens new window).
It runs several checks to make sure your module will run smoothly on PrestaShop. As it is not currently open source, see this document (opens new window) to learn about the different checks it performs.
# Look At the Validation Checklist
Make sure your module is compliant with all the rules listed in the validation checklist.
# Add Your Module Key
After submitting your marketing information, follow this procedure to add your module_key to your module:
Log in to your PrestaShop Marketplace account (opens new window).
Access your seller account.
In the Products section, select the module you are working on.
Scroll down, and click on Click here to add a zip:

Copy your module key:

Access the
<module_name>.phpfile at the root of your module folder, and add the module key to theconstructfunction as follows:<?php public function __construct() { // etc. $this->module_key = 'c1614c239af92968e5fae97f366e9961'; }Save your file.
➡️ Your module key is now added to your module.
PS Billings Live Mode
If you are using the PS Billings component, it is necessary to activate the Live mode by changing the Sandbox argument to false, like in the code below.
<module_name>.ps_billings_context_wrapper:
    class: 'PrestaShopCorp\Billing\Wrappers\BillingContextWrapper'
    arguments:
    - '@<module_name>.ps_accounts_facade'
    - '@<module_name>.context'
    - false # if true, enables the sandbox mode, if false or empty, disables it
# Upload Your Module
Now that you have added the key, you can upload the module to your seller account. Proceed as follows:
- Zip your module.
Note
The zip archive submitted to our team must contain all the necessary files for your module, and have the same name as your module: if the main file of your module is called "module_name.php", then it should be in the "module_name" folder, in the "module_name.zip" archive – without a version number, and without adding "PrestaShop" or "module".
Make sure that the name used for your file and zip is also the same as the one you used for your product page (so that the online seller can quickly identify your module in the back office of their store). Feel free to customize the name, for example with the name of your company or your initials.
Go back to the submission page on your seller account.
Specify the PrestaShop versions your module supports and add a least one changelog.
Upload your zip. You might encounter the following issues:
Issue 1: Do not zip your module on a Mac computer, or if you do, use a Mac cleaner such as ZipCleaner (opens new window) to remove the additional files.
Issue 2: Your folder structure might be invalid. If so, try to compress the module folder instead of the files.
Issue 3: Your module size might be too big. Check the assets and see if you can remove images.
Issue 4: The file name migh be incorrect. Your zip name must match the folder module name.
Issue 5:
$this->namecan only contain alphanumeric characters (lowercase) & underscores. Make sure your module name is abcde_fgh. Do not use any constant.Reupload your file until every issue is fixed.
Check the required boxes, and click on Submit your file.
➡️ When you submit your zip, it will be automatically sent to the validator, then the technical team will test it and review the code. It usually takes us 5 to 10 working days to review the contents. Once your module has been verified, you will receive an e-mail informing you of its status (✔️ approved or ❌ rejected). If there is any issue, you will get detailed information on what to change before resubmitting your module.
➡️ After technical validation, the marketing team will check the product page information provided in all selected languages within 10 working days. You will also be notified by e-mail of the validation status and of necessary changes, if any. Finally, your module will be made available to merchants on the PrestaShop Marketplace.
# Create a demo shop for your module
When you submit your product sheet, you can offer a demo shop for your module, so that merchants can test your module.
# 1. Add a new profile
To restrict use of the back office to configuring your module, you need to create a profile with limited rights.
In your back office, go to the Advanced Parameters, Team section, then to the Profiles tab:
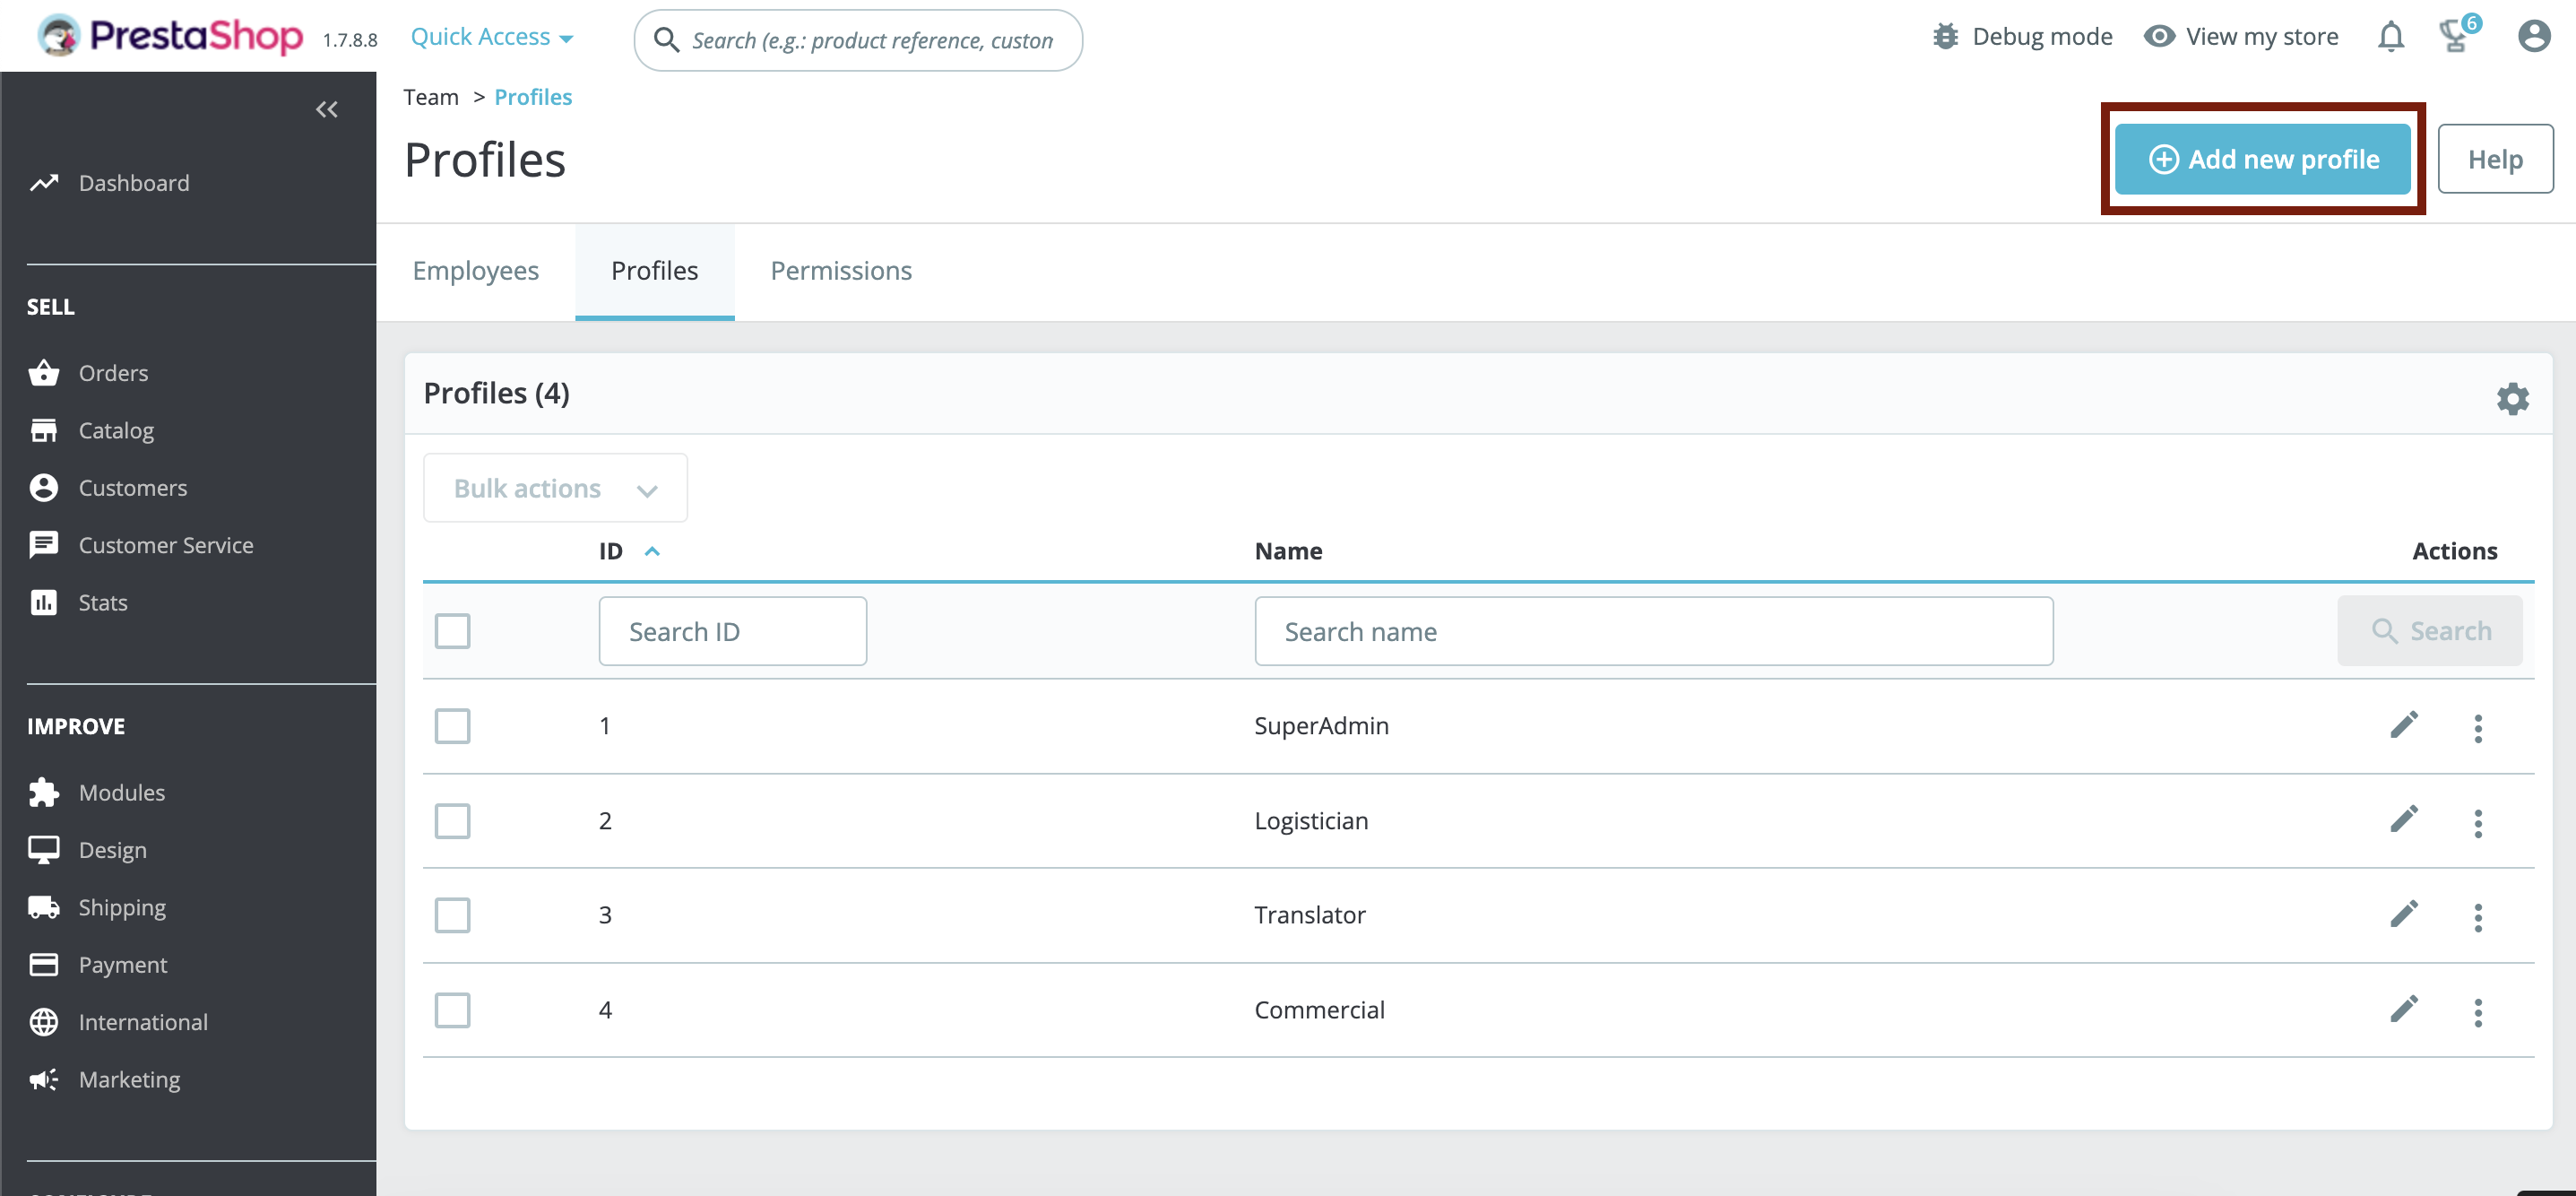
Add a new profile:
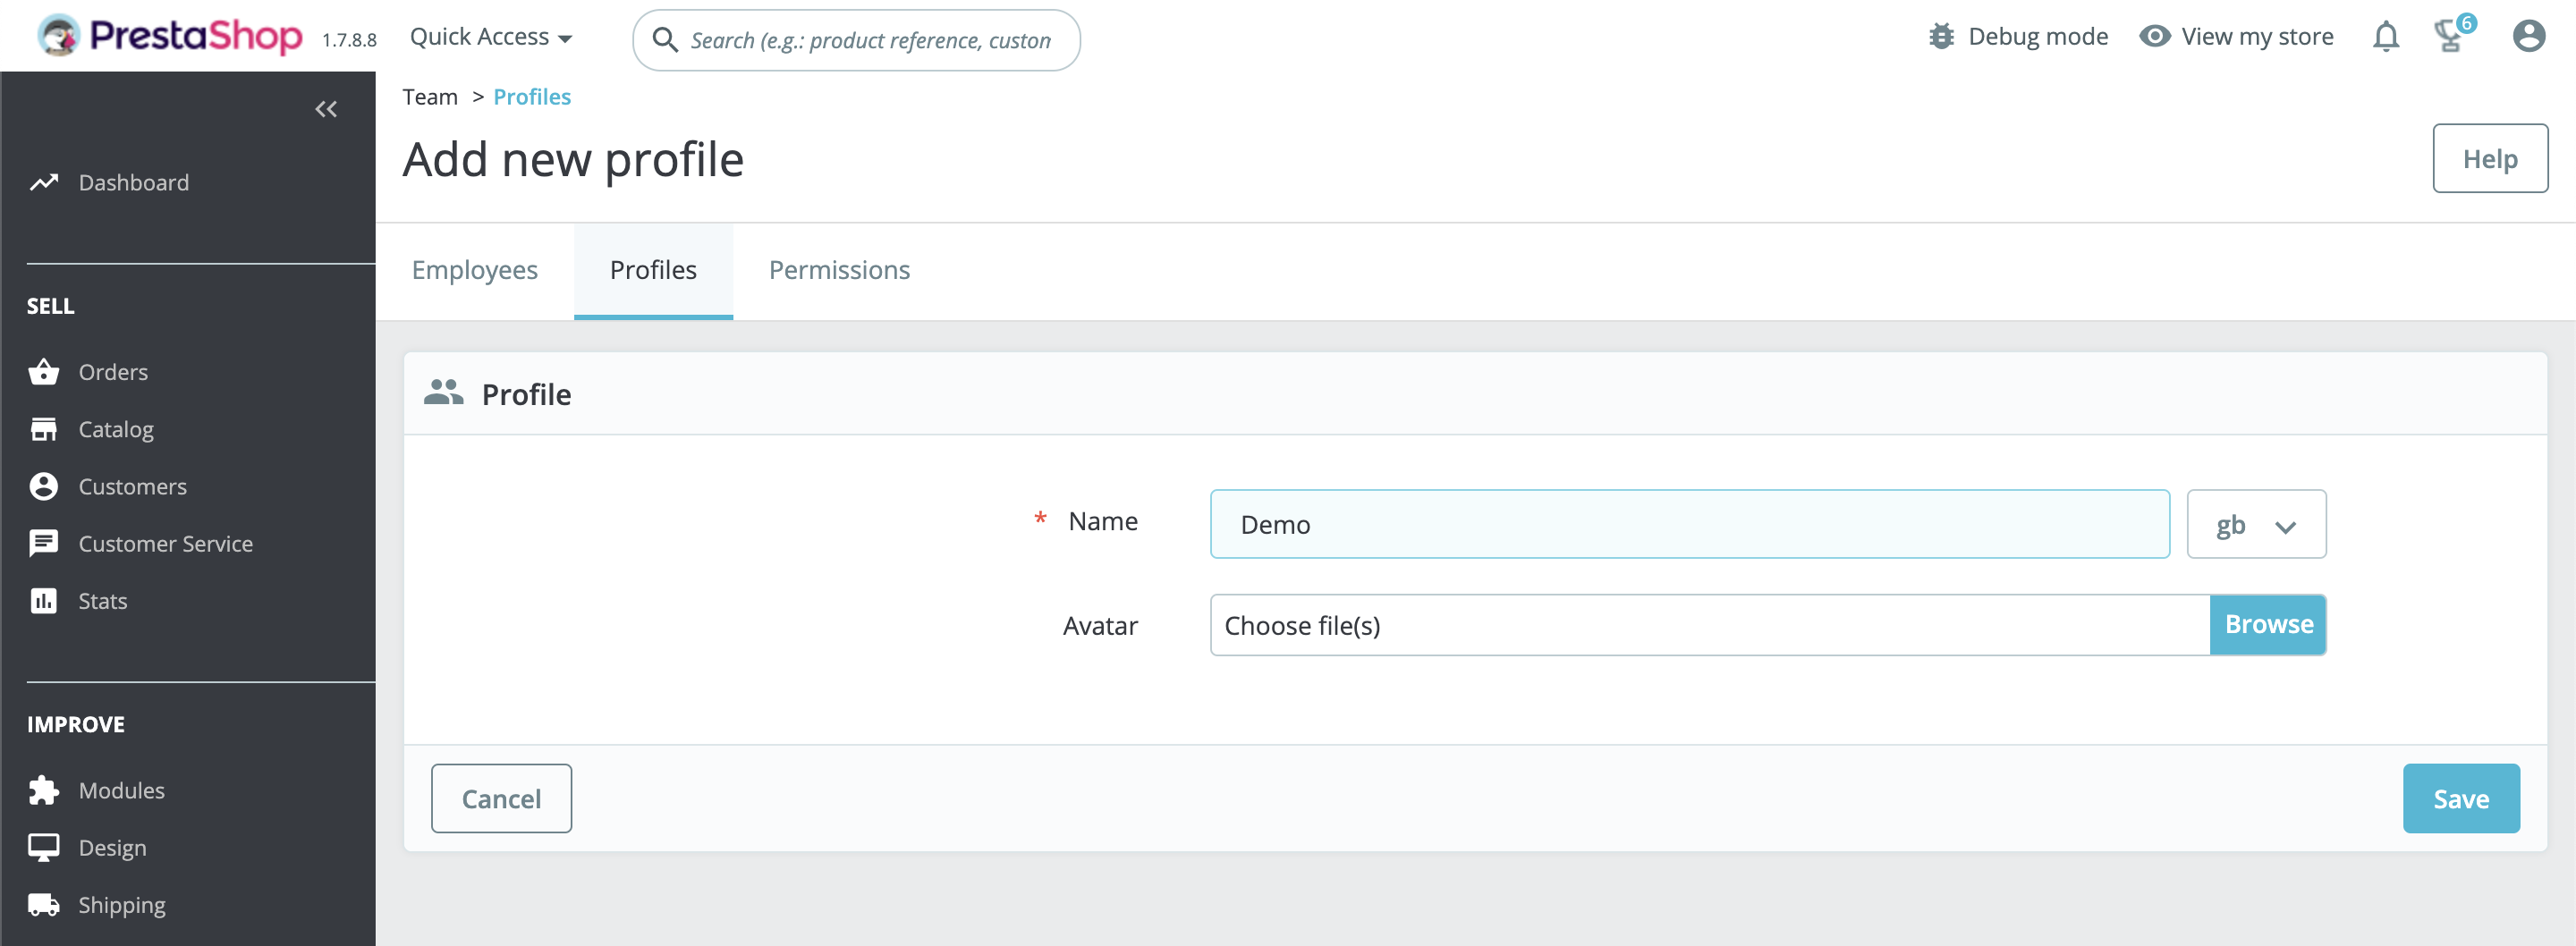
# 2. Configure profile’s permissions
In the Permissions tab, select the profile you have just created and grant it the rights below. In the right-hand column, choose your module, which has already been installed in your shop.

WARNING
Please note that the module configuration will only work with the default form (submitTechnicalName). If your module contains several configuration forms, this will not work.
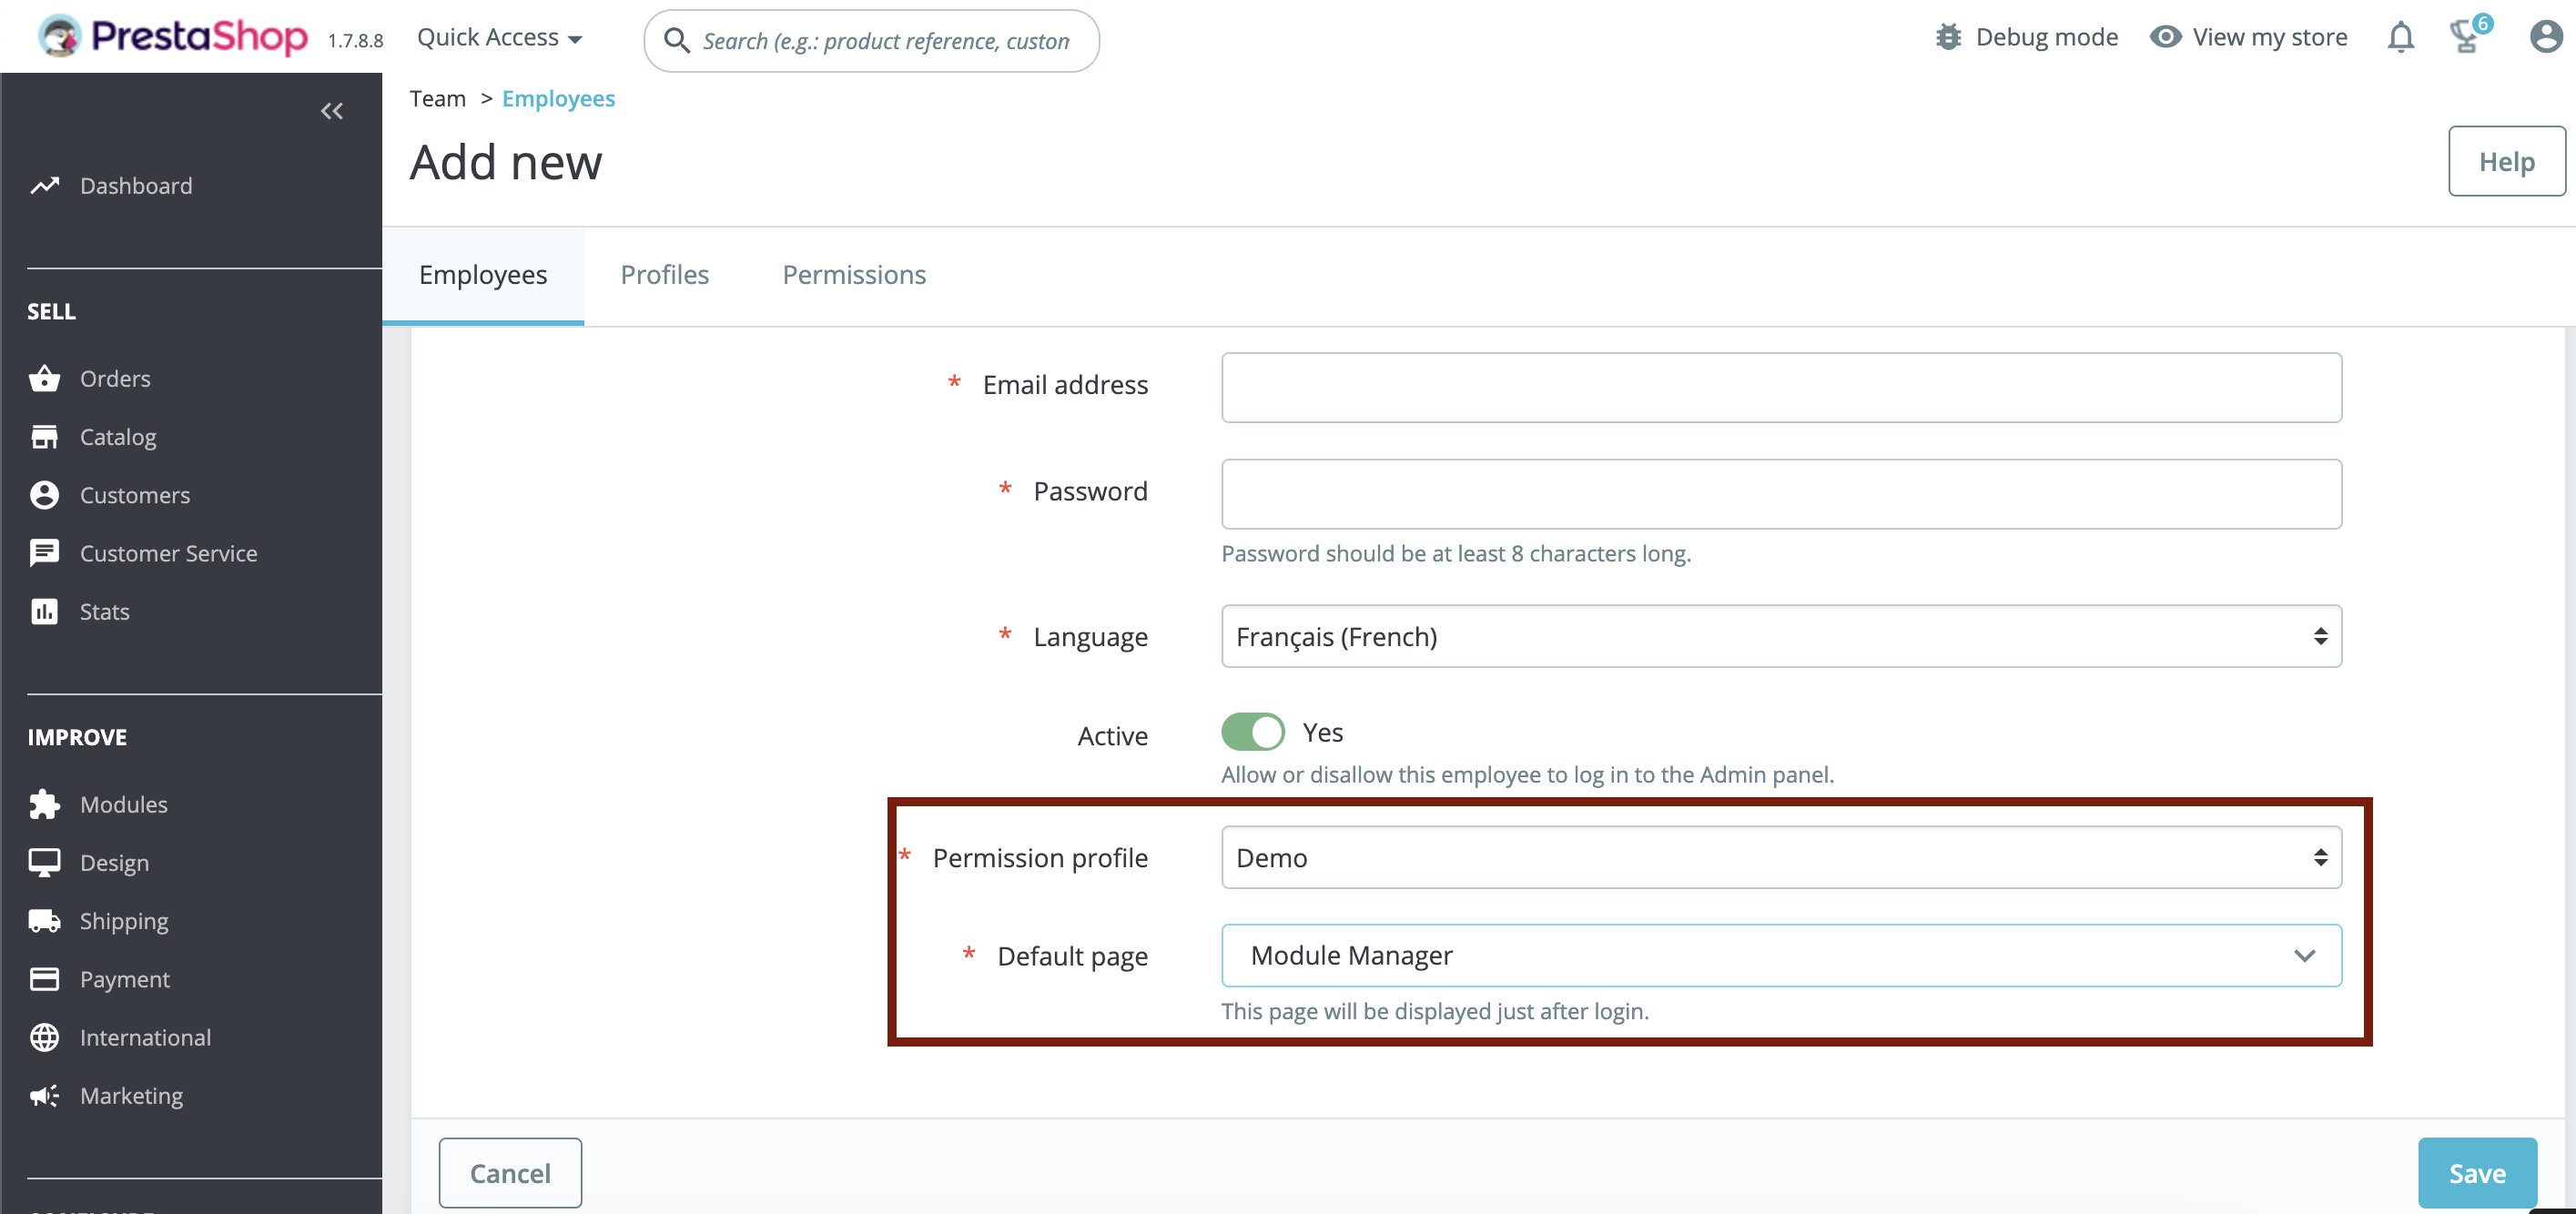
# 3. Create a back office account
You can now create an account to access the back office with the permissions you created earlier.
In general, the email to use is [email protected] and the password demodemo.

You need to set the default page to "Module Manager", the only one available with demo profile permissions.
For PrestaShop 8.x
From PrestaShop 8, this password will be considered too simple, so you need to change the password policy in the security settings.

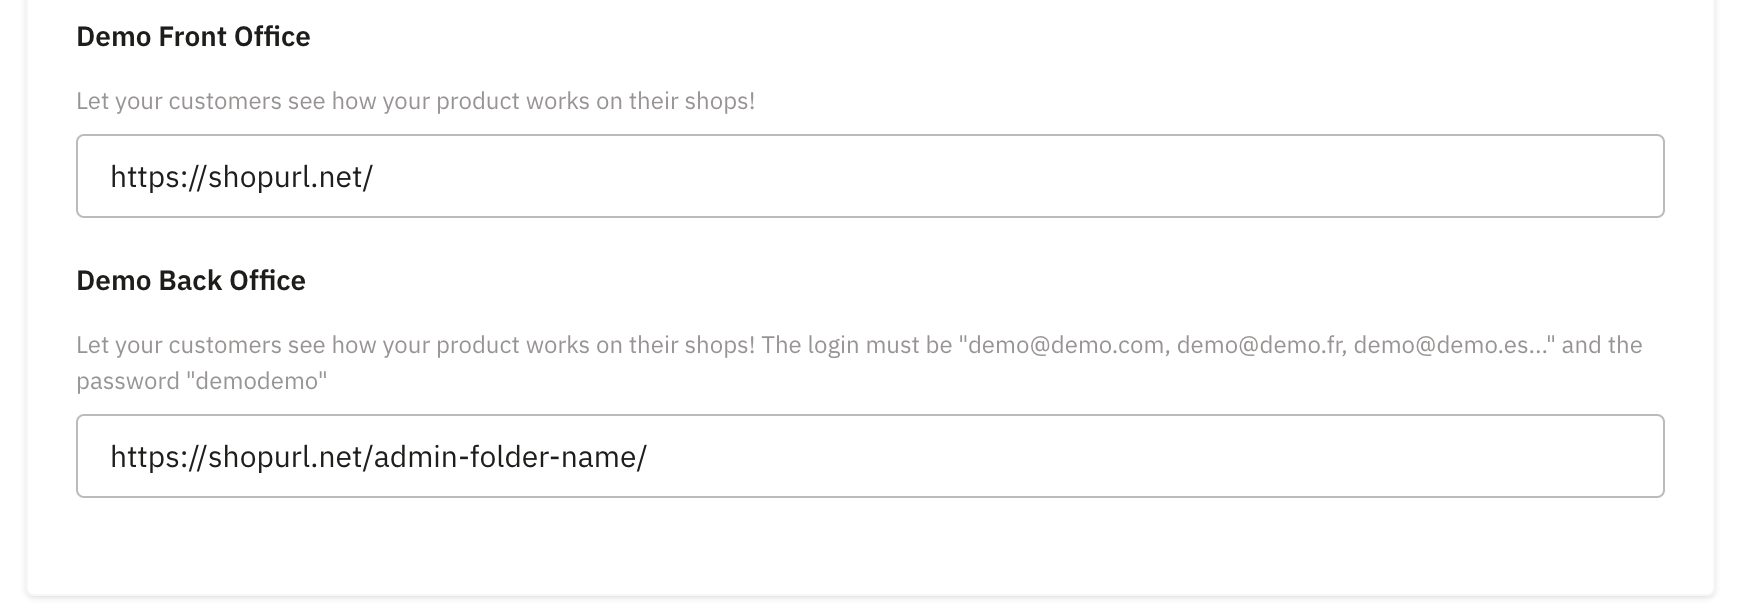
# 4. Add the demo shop url to your product sheet
When you submit your product sheet, you can enter the information for your demo.
# 5. Other information about demo shops
# Regular reset of demonstration instances
Even with restricted rights in the back office, visitors of the demo will be able to modify the module's configuration.
To ensure a consistent experience over time, we recommend that you reset the shop regularly (every night, for example) so that you return to a shop with the module's default settings. Or to just “reset” the module configuration itself.
# Cookie management for display in the Addons iframe
The Addons marketplace displays demo shops via an iframe. The shop's cookie management must therefore be modified to allow this.
You need to change this setting to able user to login in the back-office, in the Administration section.
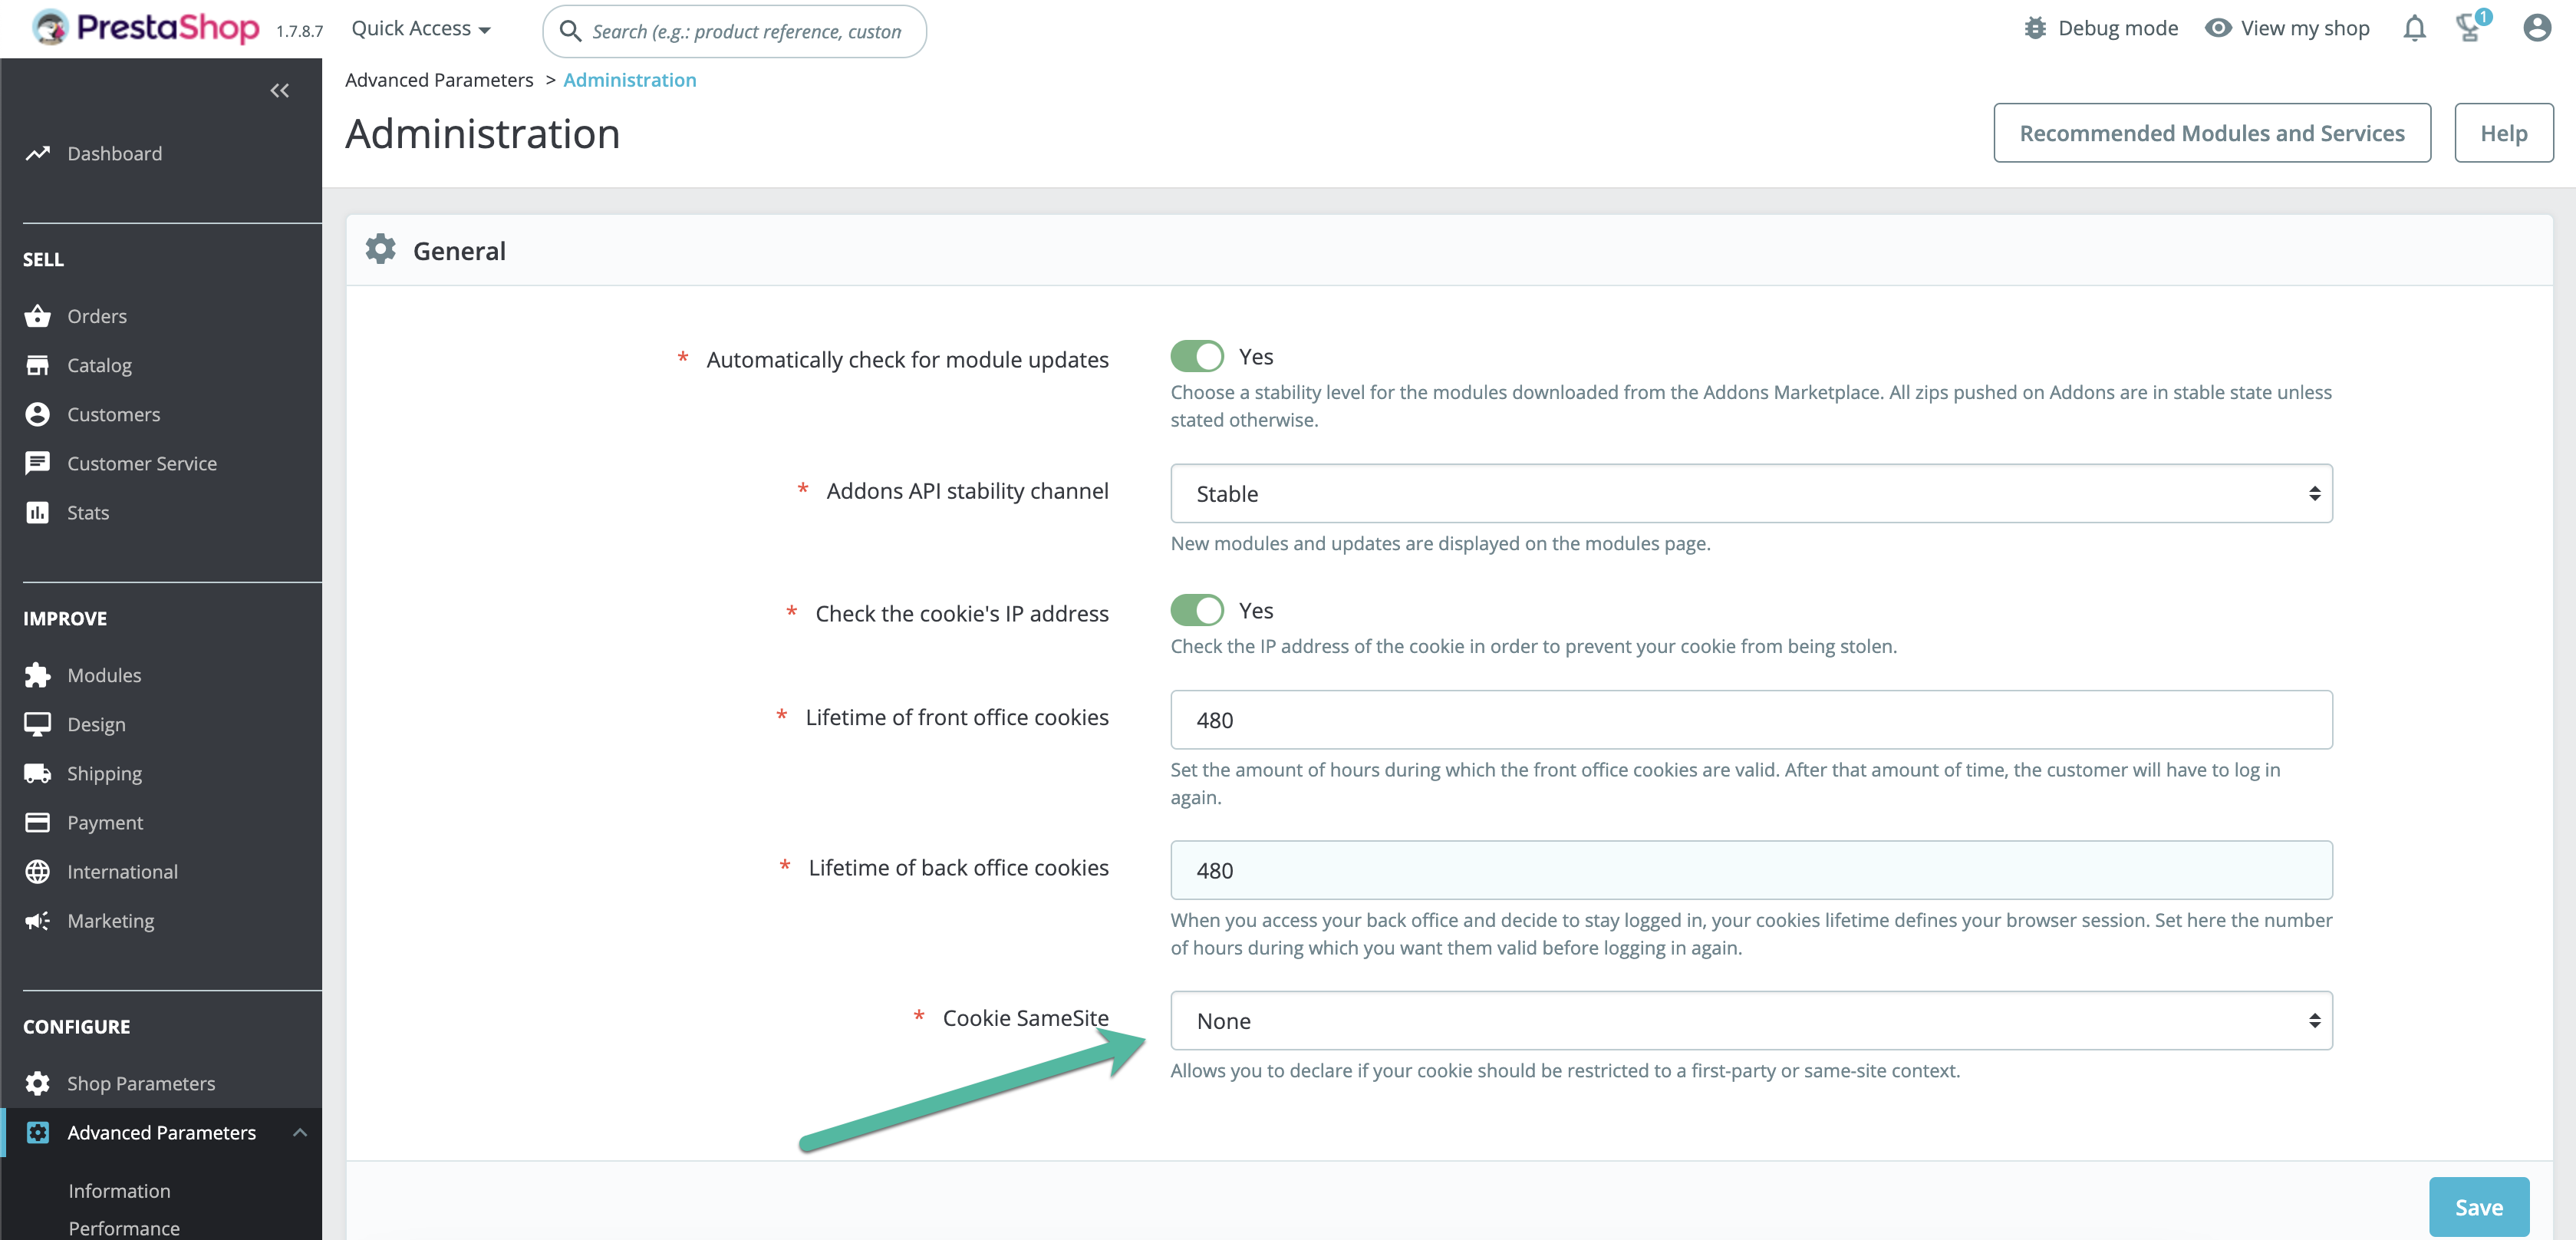
This allows cookies from a domain name other than that of the shop to be authorised. To be used for demonstration purposes only.
You can also modify the .htaccess at the root of your shop to apply this rule to all cookies.
<ifmodule mod_headers.c>
Header always edit Set-Cookie ^(.*)$ $1;SameSite=None;Secure
</ifmodule>